前言
闭包是一个很重要的概念,也是一个很难理解的概念,这里我就不多说了,如果你还不了解闭包,可以看看这篇文章:简单了解 JavaScript 闭包
什么是单例模式
单例模式是一种常用的软件设计模式,它保证我们系统中的某一个类在任何情况下都绝对只有一个实例,这样有利于我们在系统中共享资源。这种模式通常在需要严格控制某个资源或限制系统中某个特定部分的实例数量时使用。单例模式在许多软件应用中都有广泛应用,例如配置管理、数据库连接、日志记录等。
单例模式的特征
- 全局唯一实例: 单例模式确保一个类只有一个实例对象。
- 延迟实例化: 实例对象只在第一次请求时创建,之后的请求都返回相同的实例。
- 全局访问点: 提供一个访问实例的全局入口,使得任何地方都能够获取到同一个实例。
我们可以通过闭包来实现单例模式,也可以通过构造函数等方式来实现单例模式,下面我们就来看看如何实现。
1. 闭包实现
 1
 2
 3
 4
 5
 6
 7
 8
 9
10
11
12
13
14
15
16
|
function Singleton() {
  let instance = null
  return function() {
    if (!instance) {
      instance = new Object()
    }
    return instance
  }
}

const getInstance = Singleton()

const instance1 = getInstance()
const instance2 = getInstance()

console.log(instance1 === instance2) // true
|
2. 构造函数实现
 1
 2
 3
 4
 5
 6
 7
 8
 9
10
11
|
function Singleton() {
  if (typeof Singleton.instance === 'object') {
    return Singleton.instance
  }
  Singleton.instance = this
}

const instance1 = new Singleton()
const instance2 = new Singleton()

console.log(instance1 === instance2) // true
|
3. ES6 实现
 1
 2
 3
 4
 5
 6
 7
 8
 9
10
11
12
13
|
class Singleton {
  constructor() {
    if (typeof Singleton.instance === 'object') {
      return Singleton.instance
    }
    Singleton.instance = this
  }
}

const instance1 = new Singleton()
const instance2 = new Singleton()

console.log(instance1 === instance2) // true
|
闭包与单例模式的结合
利用闭包实现单例模式的优点是:可以延迟创建实例,只有在第一次调用时才会创建实例,这样可以节省内存空间。但是这种方式也有缺点,由于闭包会使得函数中的变量都被保存在内存中,内存消耗很大,所以在实际开发中,我们要根据实际情况来选择使用。
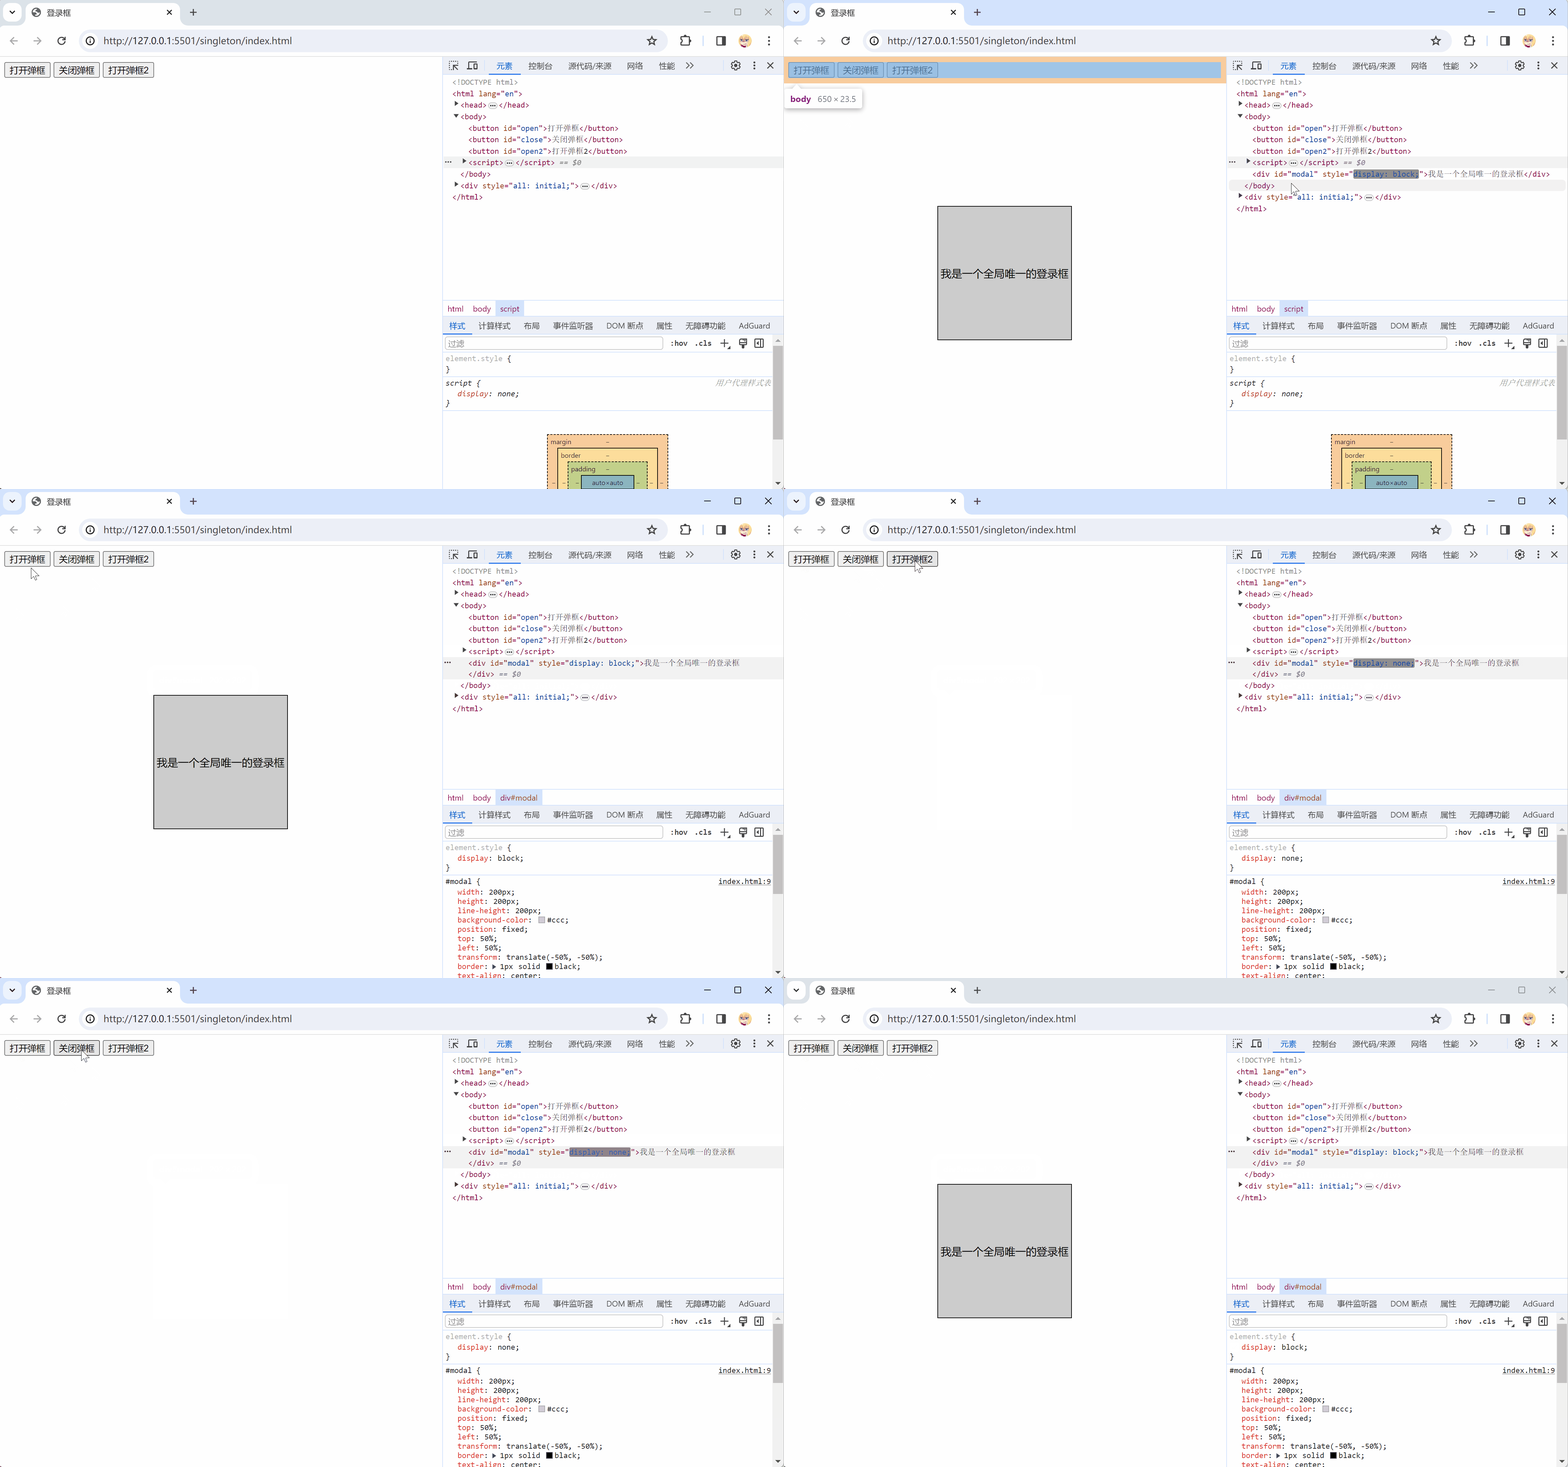
比如我们可以来实现一个登录框,我们只需要一个登录框,不需要每次都创建一个新的登录框,这样就可以使用单例模式来实现。

在这个动画中我们可以看到我们无论点击了多少次 打开弹框 和 打开弹框2 按钮,都只会创建并插入一个 DOM 元素,也就是我们的登录框(模态框),并且在点击 关闭弹框 后再次打开弹框时也不会销毁原 DOM 元素。
具体实现
 1
 2
 3
 4
 5
 6
 7
 8
 9
10
11
12
13
14
15
16
17
18
19
20
21
22
23
24
25
26
27
28
29
30
31
32
33
34
35
36
37
38
39
40
41
42
43
44
45
46
47
48
49
50
51
52
53
54
55
56
57
58
59
60
61
62
63
64
|
<!DOCTYPE html>
<html lang="en">

<head>
    <meta charset="UTF-8">
    <meta name="viewport" content="width=device-width, initial-scale=1.0">
    <title>登录框</title>
    <style>
        #modal {
            width: 200px;
            height: 200px;
            line-height: 200px;
            background-color: #ccc;
            position: fixed;
            top: 50%;
            left: 50%;
            transform: translate(-50%, -50%);
            border: 1px solid black;
            text-align: center;
        }
    </style>
</head>

<body>
    <button id="open">打开弹框</button>
    <button id="close">关闭弹框</button>
    <button id="open2">打开弹框2</button>

    <script>
        // 立即执行函数
        const Modal = (function () {
            // 创建闭包
            let modal = null

            return function () {
                if (!modal) {
                    modal = document.createElement('div')
                    modal.innerHTML = '我是一个全局唯一的登录框'
                    modal.style.display = 'none'
                    modal.id = 'modal'
                    document.body.appendChild(modal)
                }
                return modal
            }
        })()

        document.getElementById('open').addEventListener('click', function () {
            const modal = new Modal()
            modal.style.display = 'block'
        })

        document.getElementById('open2').addEventListener('click', function () {
            const modal = new Modal()
            modal.style.display = 'block'
        })

        document.getElementById('close').addEventListener('click', function () {
            const modal = new Modal()
            modal.style.display = 'none'
        })
    </script>
</body>

</html>
|
我们可以来分析一下,为什么我们点击 打开弹框 和 打开弹框2 按钮时都只会创建一个 DOM 元素,而不会创建多个 DOM 元素。
首先我们在 Modal 函数中创建了一个闭包,这个闭包中保存了一个变量 modal,这个变量在闭包中是一直存在的,不会被销毁,所以我们在第一次调用 Modal 函数时,会创建一个 DOM 元素并插入到页面中,然后将这个 DOM 元素赋值给 modal 变量,这样 modal 变量就指向了这个 DOM 元素,当我们再次调用 Modal 函数时,由于闭包中的 modal 变量已经存在,所以不会再次创建 DOM 元素,而是直接返回闭包中的 modal 变量,这样我们就可以在任何地方都可以获取到这个 DOM 元素,从而实现了单例模式。
总结
本文主要介绍了闭包与单例模式的结合,通过闭包实现单例模式的优点是:可以延迟创建实例,只有在第一次调用时才会创建实例,这样可以节省内存空间。但是这种方式也有缺点,由于闭包会使得函数中的变量都被保存在内存中,内存消耗很大,所以在实际开发中,我们要根据实际情况来选择使用。

